Create Project
Create Project
Run the following command in the command line to create a desktop widget project
bash
npm create widget@latestThis command will install and execute create-widget. Just enter your project name:
shell
✔ Project name: … <your-project-name>After creation, the project directory structure is as follows:
shell
.
├── public
├── src
│   ├── App.vue
│   ├── assets
│   ├── main.ts
│   ├── router
│   ├── widgets                           # 👈 Directory for widget files
│   │   ├── clock                         # 👈 This is a simple example widget
│   │   │   ├── Clock.widget.ts           # 👈 Widget info file
│   │   │   ├── ClockConfigView.vue       # 👈 Widget settings page
│   │   │   ├── ClockWidgetRoutes.ts      # 👈 Widget routes
│   │   │   ├── ClockWidgetView.vue       # 👈 Widget page
│   │   │   ├── model
│   │   │   │   └── ClockModel.ts         # 👈 Widget data model
│   │   └── widget-router.ts
├── .vscode
├── env.d.ts
├── index.html
├── package.json
├── README.md
├── tsconfig.app.json
├── tsconfig.json
├── vite.config.ts
├── widget.package.ts                     # 👈 Widget package info, remember to modify
└── ...
Remember to update the dependencies
shell
cd <your-project-name>
npm install
Run Project
Start the vite server
shell
npm run devThe console will print the following information, indicating that the widget has been registered successfully.
shell
i Register widgets at: 2024-01-06T14:13:30.214Z                                                                                        22:13:30
i Register widget: cn.example.widget.clock, path: /widget/clock                                                                         22:13:30
i Widget size:1
Now click the tray icon in the bottom right corner, and select Add Widget
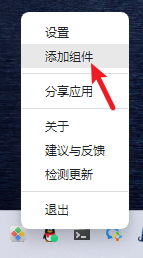
Find the Clock widget, click Add, to add the widget to the desktop
